
|
인용 방법 1. 본문 인용 (재료 및 방법): 2. 주요 자원 표: |
||
|
무료 전화: (877) 796-6397 -- 미국 및 캐나다 전용 -- |
팩스: +1-832-582-8590 주문: +1-832-582-8158 |
기술 지원: +1-832-582-8158 Ext:3 이메일에 주문 번호를 기재해 주십시오. |
생물학적 설명
| 특이성 | APE Antibody (Rabbit mAb) [F3K5]은(는) 내인성 수준의 총 APE 단백질을 검출합니다. |
|---|---|
| 배경 | 아퓨린/아피리미딘 엔도뉴클레아제 1(APE1, APEX1 또는 Ref-1으로도 알려짐)은 포유류 세포에서 주요 아염기 부위 엔도뉴클레아제이며, 염기 절제 복구(BER)를 전사 인자의 산화환원 조절 및 더 광범위한 DNA 손상 반응 신호 전달과 통합하는 다기능 핵 단백질입니다. 이 단백질은 2가 금속 의존성 α/β 포스포에스테라아제 슈퍼패밀리에 속하며, 활성 부위 잔기와 DNA 결합, 병변 인식 및 절단 화학을 매개하는 유연한 루프를 포함하는 구조화된 C-말단 촉매 코어를 가지고 있습니다. 또한, 핵 표적화와 파트너 단백질을 위한 상호작용 인터페이스를 제공하고 국소화 및 조절 기능을 조절하는 독특한 N-말단 세그먼트를 포함합니다. APE1은 염기 절제 복구 중이나 자발적인 염기 소실로 생성된 아염기 부위를 인식하고, 병변을 컴팩트한 활성 부위 포켓으로 뒤집어 아염기 뉴클레오타이드의 5' 측 인산디에스테르 골격을 절단하여 DNA 폴리머라아제 β에 의한 후속 갭 채우기 및 결합에 적합한 3'-하이드록실 및 5'-데옥시리보스 인산 말단을 가진 닉(nick)을 생성함으로써 독성 AP 부위 및 단일 가닥 절단의 축적을 방지합니다. 이 효소는 또한 3'-수리 디에스테라아제 및 3'-엑소뉴클레아제 활성을 통해 3'-인산염 및 3'-포스포글리콜레이트와 같은 다양한 3'-차단 그룹을 제거하여 산화적 및 방사선 유도 손상으로 발생하는 DNA 말단 처리에 직접 기여하고 여러 복구 경로의 완료를 촉진합니다. 추가적인 뉴클레오타이드 절개 복구 활성은 APE1이 이전의 글리코실라아제 작용 없이 일부 산화적으로 손상된 염기를 직접 절개할 수 있게 하여, 정규 BER을 넘어 역할을 확장하고 산화된 퓨린 및 피리미딘을 위한 대체 복구 경로와 연결합니다. 산화환원 조절 기능은 N-말단 영역에 있으며, 여기서 APE1은 AP-1, NF-κB, HIF-1α 및 Others와 같은 전사 인자의 중요한 시스테인 잔기를 DNA 결합을 촉진하는 환원 상태로 유지하여 세포 산화환원 상태와 DNA 손상을 염증, 혈관 신생 및 스트레스 적응을 조절하는 전사 반응과 결합합니다. APE1은 수많은 DNA 복구 및 염색질 관련 파트너와 상호작용하여 병변 인식, 복구 합성 및 염색질 접근을 조정하고 ATM/ATR 매개 체크포인트 경로와도 인터페이스하는 BER 인터랙톰의 중심 허브를 형성하며, 유전독성 스트레스 후 게놈 안정성과 세포 운명의 조절자로서 APE1의 위치를 확립합니다. APE1 발현, 세포 내 분포 및 번역 후 변형의 엄격한 조절은 세포 생존에 필수적입니다. 마우스 배아에서 고갈은 치명적이며 산화 및 알킬화 손상에 대한 저항성을 손상시키며, 비정상적인 과발현, 잘못된 위치 지정 또는 변화된 활성은 다양한 암 및 신경 병리학에서 보고되며 치료 저항성 및 질병 감수성과 관련이 있습니다. |
사용 정보
| 응용 | WB, IHC, IF, FCM, ChIP | 희석 |
|
||||||||||
|---|---|---|---|---|---|---|---|---|---|---|---|---|---|
| 반응성 | Mouse, Rat, Human | ||||||||||||
| 출처 | Rabbit Monoclonal Antibody | MW | 36 kDa | ||||||||||
| 보관 완충액 | PBS, pH 7.2+50% Glycerol+0.05% BSA+0.01% NaN3 | 보관 (수령일로부터) |
-20°C (avoid freeze-thaw cycles), 2 years | ||||||||||
| WB |
Experimental Protocol:
Sample preparation
1. Tissue: Lyse the tissue sample by adding an appropriate volume of ice-cold RIPA/NP-40 Lysis Buffer (containing Protease Inhibitor Cocktail),and homogenize the tissue at a low temperature or lyse it by sonication on ice, then incubate on ice for 30 minutes.
2. Adherent cell: Aspirate the culture medium and wash the cells with ice-cold PBS twice. Lyse the cells by adding an appropriate volume of RIPA/NP-40 Lysis Buffer (containing Protease Inhibitor Cocktail) , sonicate to lyse the cells, and incubate on ice for 30 minutes.
3. Suspension cell: Transfer the culture medium to a pre-cooled centrifuge tube. Centrifuge and aspirate the supernatant. Wash the cells with ice-cold PBS twice. Lyse the cells by adding an appropriate volume of RIPA/NP-40 Lysis Buffer (containing Protease Inhibitor Cocktail) , sonicate to lyse the cells, and incubate on ice for 30 minutes.
4. Place the lysate into a pre-cooled microcentrifuge tube. Centrifuge at 4°C for 15 min. Collect the supernatant;
5. Remove a small volume of lysate to determine the protein concentration;
6. Combine the lysate with protein loading buffer. Boil 20 µL sample under 95-100°C for 5 min. Centrifuge for 5 min after cool down on ice.
Electrophoretic separation
1. According to the concentration of extracted protein, load appropriate amount of protein sample and marker onto SDS-PAGE gels for electrophoresis. Recommended separating gel (lower gel) concentration: 10%. Reference Table for Selecting SDS-PAGE Separation Gel Concentrations
2. Power up 80V for 30 minutes. Then the power supply is adjusted (110 V~150 V), the Marker is observed, and the electrophoresis can be stopped when the indicator band of the predyed protein Marker where the protein is located is properly separated. (Note that the current should not be too large when electrophoresis, too large current (more than 150 mA) will cause the temperature to rise, affecting the result of running glue. If high currents cannot be avoided, an ice bath can be used to cool the bath.)
Transfer membrane
1. Take out the converter, soak the clip and consumables in the pre-cooled converter;
2. Activate PVDF membrane with methanol for 1 min and rinse with transfer buffer;
3. Install it in the order of "black edge of clip - sponge - filter paper - filter paper - glue -PVDF membrane - filter paper - filter paper - sponge - white edge of clip";
4. The protein was electrotransferred to PVDF membrane. ( 0.45 µm PVDF membrane is recommended ) Reference Table for Selecting PVDF Membrane Pore Size Specifications
Recommended conditions for wet transfer: 200 mA, 60 min.
( Note that the transfer conditions can be adjusted according to the protein size. For high-molecular-weight proteins, a higher current and longer transfer time are recommended. However, ensure that the transfer tank remains at a low temperature to prevent gel melting.)
Block
1. After electrotransfer, wash the film with TBST at room temperature for 5 minutes;
2. Incubate the film in the blocking solution for 1 hour at room temperature;
3. Wash the film with TBST for 3 times, 5 minutes each time.
Antibody incubation
1. Use primary antibody dilution buffer to prepare the primary antibody working liquid (recommended dilution ratio for primary antibody 1:1000), gently shake and incubate with the film at 4°C overnight;
2. Wash the film with TBST 3 times, 5 minutes each time;
3. Add the secondary antibody to the blocking solution and incubate with the film gently at room temperature for 1 hour;
4. After incubation, wash the film with TBST 3 times for 5 minutes each time.
Antibody staining
1. Add the prepared ECL luminescent substrate (or select other color developing substrate according to the second antibody) and mix evenly;
2. Incubate with the film for 1 minute, remove excess substrate (keep the film moist), wrap with plastic film, and expose in the imaging system.
|
| IHC |
Experimental Protocol:
Deparaffinization/Rehydration
1. Deparaffinize/hydrate sections:
2. Incubate sections in three washes of xylene for 5 min each.
3. Incubate sections in two washes of 100% ethanol for 10 min each.
4. Incubate sections in two washes of 95% ethanol for 10 min each.
5. Wash sections two times in dH2O for 5 min each.
6.Antigen retrieval: For Citrate: Heat slides in a microwave submersed in 1X citrate unmasking solution until boiling is initiated; continue with 10 min at a sub-boiling temperature (95°-98°C). Cool slides on bench top for 30 min.
Staining
1. Wash sections in dH2O three times for 5 min each.
2. Incubate sections in 3% hydrogen peroxide for 10 min.
3. Wash sections in dH2O two times for 5 min each.
4. Wash sections in wash buffer for 5 min.
5. Block each section with 100–400 µl of blocking solution for 1 hr at room temperature.
6. Remove blocking solution and add 100–400 µl primary antibody diluent in to each section. Incubate overnight at 4°C.
7. Remove antibody solution and wash sections with wash buffer three times for 5 min each.
8. Cover section with 1–3 drops HRPas needed. Incubate in a humidified chamber for 30 min at room temperature.
9. Wash sections three times with wash buffer for 5 min each.
10. Add DAB Chromogen Concentrate to DAB Diluent and mix well before use.
11. Apply 100–400 µl DAB to each section and monitor closely. 1–10 min generally provides an acceptable staining intensity.
12. Immerse slides in dH2O.
13. If desired, counterstain sections with hematoxylin.
14. Wash sections in dH2O two times for 5 min each.
15. Dehydrate sections: Incubate sections in 95% ethanol two times for 10 sec each; Repeat in 100% ethanol, incubating sections two times for 10 sec each; Repeat in xylene, incubating sections two times for 10 sec each.
16. Mount sections with coverslips and mounting medium.
|
| IF |
Experimental Protocol:
Sample Preparation
1. Adherent Cells: Place a clean, sterile coverslip in a culture dish. Once the cells grow to near confluence as a monolayer, remove the coverslip for further use.
2. Suspension Cells: Seed the cells onto a clean, sterile slide coated with poly-L-lysine.
3. Frozen Sections: Allow the slide to thaw at room temperature. Wash it with pure water or PBS for 2 times, 3 minutes each time.
4. Paraffin Sections: Deparaffinization and rehydration. Wash the slide with pure water or PBS for 3 times, 3 minutes each time. Then perform antigen retrieval.
Fixation
1. Fix the cell coverslips/spots or tissue sections at room temperature using a fixative such as 4% paraformaldehyde (4% PFA) for 10-15 minutes.
2. Wash the sample with PBS for 3 times, 3 minutes each time.
Permeabilization
1.Add a detergent such as 0.1–0.3% Triton X-100 to the sample and incubate at room temperature for 10–20 minutes.
(Note: This step is only required for intracellular antigens. For antigens expressed on the cell membrane, this step is unnecessary.)
Wash the sample with PBS for 3 times, 3 minutes each time.
Blocking
Add blocking solution and incubate at room temperature for at least 1 hour. (Common blocking solutions include: serum from the same source as the secondary antibody, BSA, or goat serum.)
Note: Ensure the sample remains moist during and after the blocking step to prevent drying, which can lead to high background.
Immunofluorescence Staining (Day 1)
1. Remove the blocking solution and add the diluted primary antibody.
2. Incubate the sample in a humidified chamber at 4°C overnight.
Immunofluorescence Staining (Day 2)
1. Remove the primary antibody and wash with PBST for 3 times, 5 minutes each time.
2. Add the diluted fluorescent secondary antibody and incubate in the dark at 4°C for 1–2 hours.
3. Remove the secondary antibody and wash with PBST for 3 times, 5 minutes each time.
4. Add diluted DAPI and incubate at room temperature in the dark for 5–10 minutes.
5. Wash with PBST for 3 times, 5 minutes each time.
Mounting
1. Mount the sample with an anti-fade mounting medium.
2. Allow the slide to dry at room temperature overnight in the dark.
3. Store the slide in a slide storage box at 4°C, protected from light.
|
참조
|
적용 데이터
WB
Selleck 검증
-
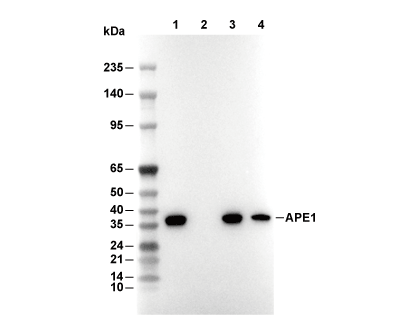 Lane 1: HeLa, Lane 2: HeLa (KO APEX1), Lane 3: HCT116, Lane 4: NIH/3T3
IF
Selleck 검증
-
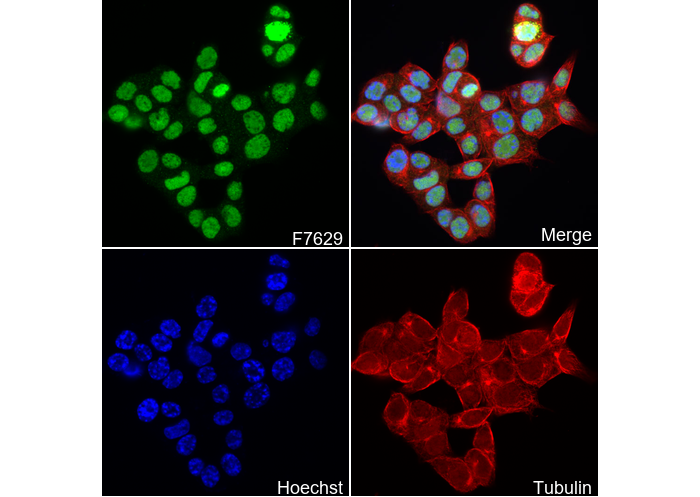 Immunofluorescent analysis of HCT116 cells using F7629 (green, 1:250), Hoechst (blue) and tubulin (Red).