연구용
GATA3 Antibody [L24F17]
카탈로그 번호: F3373
-
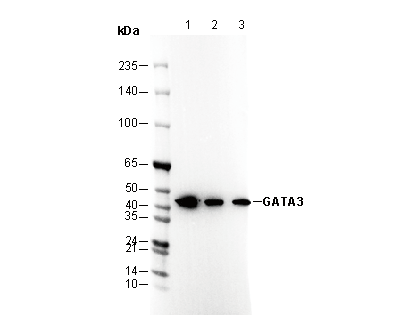 Lane 1: Mouse brain, Lane 2: EL4, Lane 3: SH-SY5Y
 -
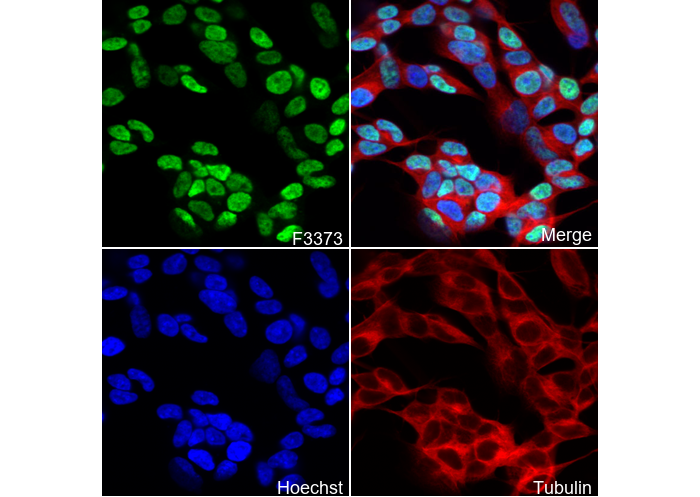 Immunofluorescent analysis of SH-SY5Y cells using F3373 (green, 1:250), Hoechst (blue) and tubulin (Red).
사용 정보
| 희석 |
|---|
|
| 응용 |
|---|
| WB, IHC, IF, FCM, ChIP |
| 반응성 |
|---|
| Human, Mouse |
| 출처 |
|---|
| Rabbit Monoclonal Antibody |
| 보관 완충액 |
|---|
| PBS, pH 7.2+50% Glycerol+0.05% BSA+0.01% NaN3 |
| 보관 (수령일로부터) |
|---|
| -20°C (avoid freeze-thaw cycles), 2 years |
| 예측 분자량 |
|---|
| 48 kDa |
실험 방법
| WB |
|---|
Experimental Protocol:
Sample preparation
1. Tissue: Lyse the tissue sample by adding an appropriate volume of ice-cold RIPA/Nuclear Lysis Buffer (containing Protease Inhibitor Cocktail),and homogenize the tissue at a low temperature or lyse it by sonication on ice, then incubate on ice for 30 minutes. 2. Adherent cell: Aspirate the culture medium and transfer the cells into an EP tube. Wash the cells with ice-cold PBS twice. Add an appropriate volume of RIPA/Nuclear Lysis Buffer (containing Protease Inhibitor Cocktail), sonicate to lyse the cells, and incubate on ice for 30 minutes. 3. Suspension cell: Transfer the culture medium to a pre-cooled centrifuge tube. Centrifuge and aspirate the supernatant. Wash the cells with ice-cold PBS twice.Add an appropriate volume of RIPA/Nuclear Lysis Buffer (containing Protease Inhibitor Cocktail), sonicate to lyse the cells, and incubate on ice for 30 minutes. 4. Place the lysate into a pre-cooled microcentrifuge tube. Centrifuge at 4°C for 15 min. Collect the supernatant;
5. Remove a small volume of lysate to determine the protein concentration;
6. Combine the lysate with protein loading buffer. Boil 20 µL sample under 95-100°C for 5 min. Centrifuge for 5 min after cool down on ice.
Electrophoretic separation
1. According to the concentration of extracted protein, load appropriate amount of protein sample and marker onto SDS-PAGE gels for electrophoresis. Recommended separating gel (lower gel) concentration: 10%. Reference Table for Selecting SDS-PAGE Separation Gel Concentrations 2. Power up 80V for 30 minutes. Then the power supply is adjusted (110 V~150 V), the Marker is observed, and the electrophoresis can be stopped when the indicator band of the predyed protein Marker where the protein is located is properly separated. (Note that the current should not be too large when electrophoresis, too large current (more than 150 mA) will cause the temperature to rise, affecting the result of running glue. If high currents cannot be avoided, an ice bath can be used to cool the bath.)
Transfer membrane
1. Take out the converter, soak the clip and consumables in the pre-cooled converter;
2. Activate PVDF membrane with methanol for 1 min and rinse with transfer buffer;
3. Install it in the order of "black edge of clip - sponge - filter paper - filter paper - glue -PVDF membrane - filter paper - filter paper - sponge - white edge of clip"; 4. The protein was electrotransferred to PVDF membrane. ( 0.45 µm PVDF membrane is recommended ) Reference Table for Selecting PVDF Membrane Pore Size Specifications Recommended conditions for wet transfer: 200 mA, 120 min. ( Note that the transfer conditions can be adjusted according to the protein size. For high-molecular-weight proteins, a higher current and longer transfer time are recommended. However, ensure that the transfer tank remains at a low temperature to prevent gel melting.)
Block
1. After electrotransfer, wash the film with TBST at room temperature for 5 minutes;
2. Incubate the film in the blocking solution for 1 hour at room temperature;
3. Wash the film with TBST for 3 times, 5 minutes each time.
Antibody incubation
1. Use 5% skim milk powder to prepare the primary antibody working liquid (recommended dilution ratio for primary antibody 1:1000), gently shake and incubate with the film at 4°C overnight; 2. Wash the film with TBST 3 times, 5 minutes each time;
3. Add the secondary antibody to the blocking solution and incubate with the film gently at room temperature for 1 hour;
4. After incubation, wash the film with TBST 3 times for 5 minutes each time.
Antibody staining
1389. Add the prepared ECL luminescent substrate (or select other color developing substrate according to the second antibody) and mix evenly;
2. Incubate with the film for 1 minute, remove excess substrate (keep the film moist), wrap with plastic film, and expose in the imaging system. |
생물학적 설명
| 특이성 |
|---|
GATA3 Antibody [L24F17] recognizes endogenous levels of total GATA3 protein. |
| 세포 내 위치 |
|---|
| Nucleus |
| 클론 |
|---|
| L24F17 |
| 배경 |
|---|
GATA-3 is a 444-amino-acid zinc finger transcription factor encoded by the GATA3 gene on chromosome 10p14, playing key roles in cell type-specific gene regulation. It is highly conserved and expressed in a subset of hematopoietic cells (particularly T lymphocytes), the central and peripheral nervous systems, kidney, and placental trophoblasts. Structurally, GATA-3 contains two C4-type zinc finger domains: the C-terminal zinc finger directly binds to GATA DNA motifs, while the N-terminal zinc finger enhances DNA binding stability by wrapping around DNA in cooperation with the basic tail. It also includes two N-terminal transactivation domains (amino acids 30–74) that regulate transcriptional activity. A flexible linker between the zinc fingers enables GATA-3 to bind DNA in diverse orientations, contributing to its role as a pioneer transcription factor in chromatin remodeling. |
| 참고문헌 |
|---|
|
기술 지원
제품은 연구용으로만 사용됩니다. 인체에는 사용하지 마십시오. 환자에게 판매하지 않습니다.
©Copyright 2013 Selleck Chemicals. All Rights Reserved.